The reassuring look of a clean, shiny bathroom is often a dangerous illusion; true safety lies in the measurable, microscopic texture of its surfaces, not its appearance.
- Common safety aids like rubber mats can breed mould and become slip hazards themselves over time.
- Aggressive cleaning with abrasive or acidic products actively destroys the anti-slip properties of floors and tubs.
Recommendation: Stop guessing and start measuring. Understanding and managing the Pendulum Test Value (PTV) of your wet surfaces is the only reliable way to prevent falls.
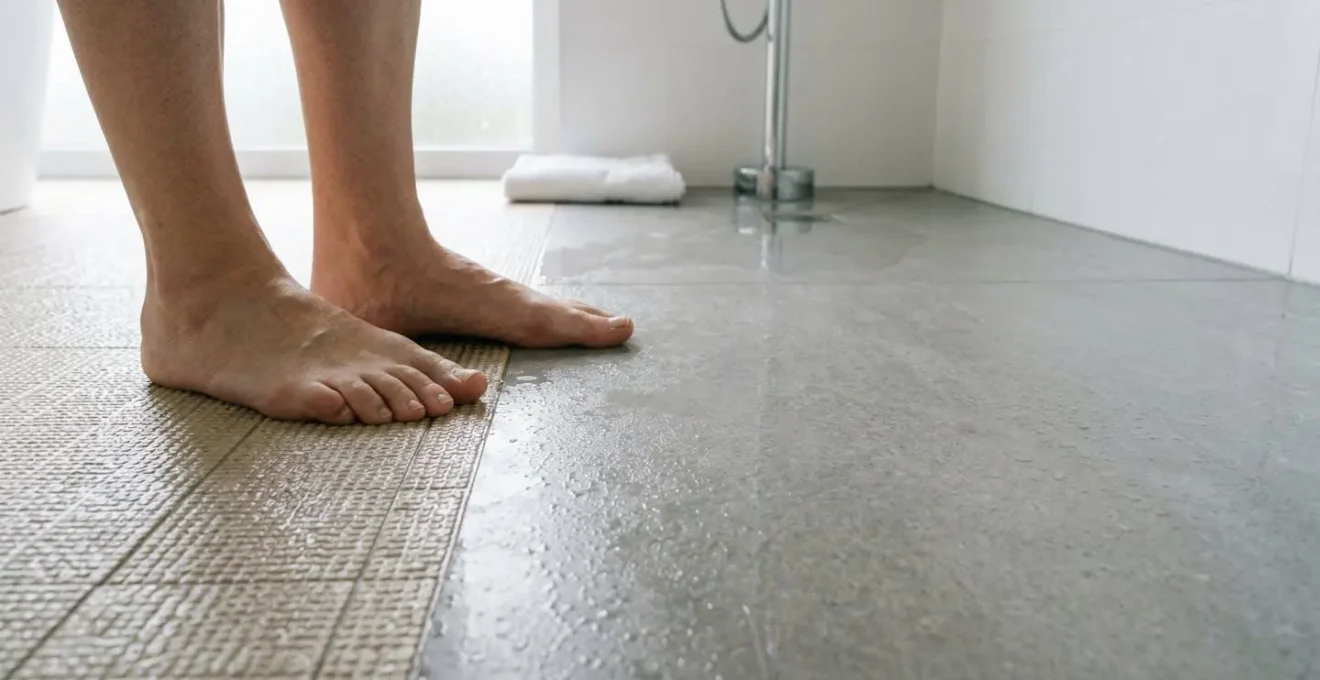
For many seniors and their carers in the UK, the fear of a fall, particularly in the bathroom, is a constant, low-level anxiety. A slip can lead to devastating consequences, from a loss of confidence to a life-altering injury. In response, we diligently place rubber mats, install grab rails, and scrub surfaces until they gleam. We create what we believe is a fortress of safety. Yet, a startling number of falls happen precisely in these « secured » environments. The hard truth is that many conventional safety measures provide a dangerous illusion of security rather than a real, physical one.
The problem is not a lack of effort, but a misunderstanding of the enemy. We fight the visible grime, but the real danger is an invisible one: the microscopic surface texture, or ‘micro-profile’, that determines grip when wet. A surface that feels safe to a dry hand can become a frictionless skating rink with the addition of water and soap. This is where the platitudes of « keep it clean » and « use a mat » fall apart. In fact, as we will explore, some cleaning methods actively make surfaces more dangerous, and mats can become a bigger hazard than the surface they are meant to cover.
This guide moves beyond the superficial advice. We will not just tell you what to do; we will explain the science behind it. The key is to shift your mindset from adding temporary fixes to permanently managing the friction of the surfaces themselves. By understanding the professional metrics used to gauge slip resistance, like the Pendulum Test Value (PTV), you can make informed decisions that create genuine, lasting safety. We will deconstruct the effectiveness of coatings versus mats, reveal how your cleaning routine could be sabotaging your efforts, and provide a clear framework for lighting and support that works with human biology, not against it.
This article provides a comprehensive look at creating a genuinely safer bathroom environment. The following sections break down each critical component, from understanding surface friction to the correct placement of essential aids, to empower you with the knowledge to protect yourself and your loved ones effectively.
Summary: The Hidden Hazard: Why Most Bathroom Falls Happen on Surfaces Believed to Be Safe
- What Does a Pendulum Test Score Mean and What Rating Keeps Wet Bathrooms Safe?
- How to Apply Anti-Slip Coating to Your Bathtub Without Replacing It or Hiring a Professional?
- Rubber Bath Mat vs Etched Anti-Slip Coating: Which Stays Effective After 100 Uses?
- The Bathroom Cleaner That Strips Your Anti-Slip Coating Within 6 Months
- How Often Should You Retest and Retreat Your Bathroom Floor to Maintain Slip Protection?
- Why Poor Lighting in Your Hallway Could Be the Reason for Your Next Hospital Stay?
- Where Exactly Should Grab Rails Go Around a Toilet to Prevent a Fall Getting Up?
- Why Does Installing a Grab Rail Reduce Hip Fracture Risk by 30%?
What Does a Pendulum Test Score Mean and What Rating Keeps Wet Bathrooms Safe?
The first step in defeating an invisible enemy is to make it visible through measurement. In the world of floor safety, the gold standard for measuring slip resistance, especially in wet conditions, is the Pendulum Test Value (PTV). This isn’t a subjective opinion; it’s a precise, scientific assessment recognized by the UK Health and Safety Executive (HSE). The test involves a swinging, pendulum-like arm with a rubber slider that mimics a person’s heel striking a wet floor. The distance it swings past the contact point determines the surface’s friction. A higher PTV means more friction and less risk of slipping.
So, what number means ‘safe’? While a dry floor might be perfectly safe with a low PTV, the game changes dramatically when water is introduced. For high-risk wet areas like a domestic bathroom, you should aim for a surface that achieves a PTV of 36 or higher. According to UK Health and Safety Executive guidelines, this score indicates a low slip potential, translating to a one-in-a-million chance of a slip. Relying on a surface with a lower score is a gamble, as the risk increases exponentially.
Understanding the PTV scale illuminates the hidden danger of a visually clean but texturally smooth floor. A shiny tile might look appealing, but if its wet PTV is in the low 20s, it presents a significant hazard. Here’s how the risk breaks down:
- PTV of 36+: Low slip potential (the target for wet bathrooms).
- PTV of 27-35: Moderate slip potential.
- PTV of 24-26: High slip potential (a 1 in 20 probability of a slip).
- PTV below 24: Extremely hazardous.
This objective data is far more reliable than the « it feels grippy enough » test. When choosing new flooring or a surface treatment, asking for its wet PTV rating is the single most important question you can ask to ensure real safety.
How to Apply Anti-Slip Coating to Your Bathtub Without Replacing It or Hiring a Professional?
Achieving a safe PTV score in your existing bathtub or shower doesn’t necessarily mean an expensive replacement. A high-quality DIY anti-slip coating kit can create a permanent, invisible, and effective micro-profile on your existing surface. Unlike bath mats, these treatments bond directly with the porcelain or acrylic, creating a texture that provides grip when wet but remains comfortable and easy to clean. The process is straightforward and can be completed in an afternoon.
The first and most critical step is surface preparation. The coating needs a perfectly clean and dry surface to bond to. Begin by thoroughly cleaning the tub with a non-abrasive, residue-free cleaner to remove all traces of soap scum, body oils, and cleaning agents. For stubborn grime, a specialized pre-cleaner, often included in the kit, is ideal. Once cleaned, rinse the surface meticulously and allow it to dry completely. Using a hairdryer can speed up this process and ensure no moisture remains trapped in the pores of the surface.
Next comes the application of the treatment itself. Most DIY kits use a two-part system: a cleaner/preparer and the etching or coating solution. Following the manufacturer’s instructions to the letter is paramount. Typically, you will apply the solution evenly across the bottom surface of the tub or shower tray. You may need to use a small roller or sponge applicator provided in the kit. The solution works by creating microscopic peaks and valleys on the surface. This is not a layer that sits on top; it’s a chemical reaction that changes the surface’s texture itself.
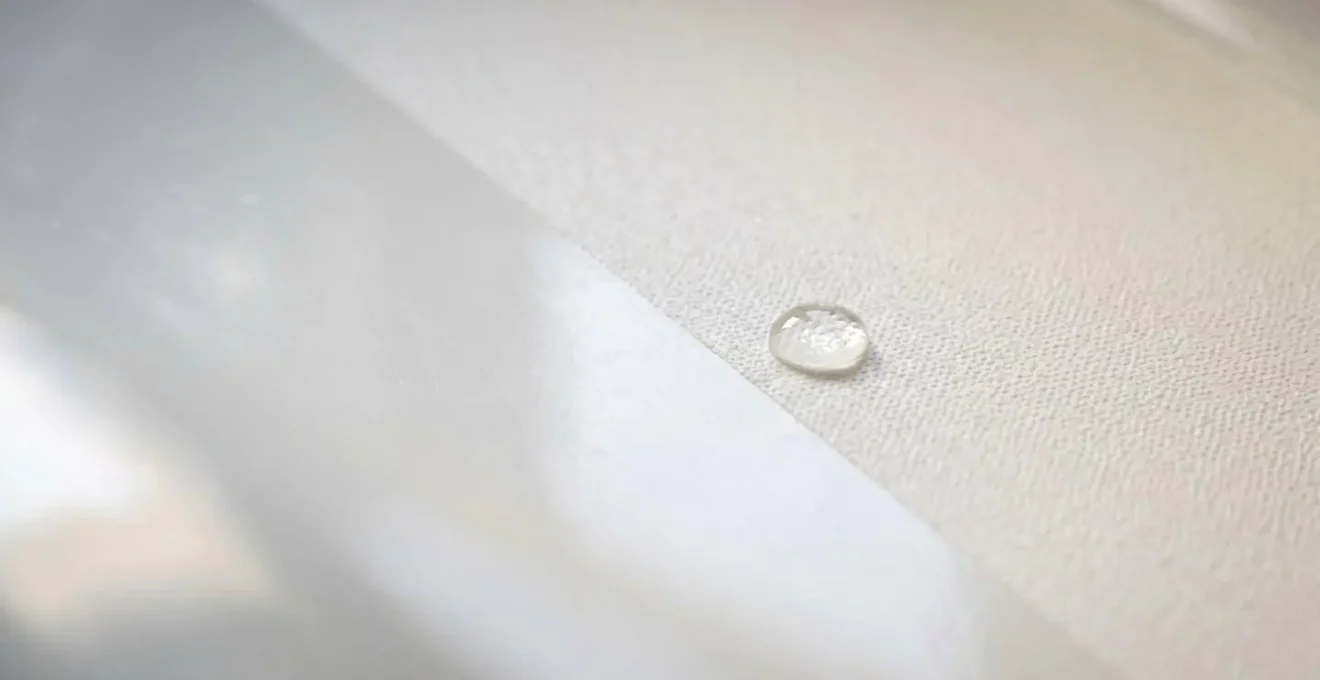
As this image shows at a microscopic level, the treated surface has a distinct texture compared to the smooth, untreated area. This textured micro-profile is what provides the grip. After the recommended time—usually just a few minutes—you’ll rinse the solution away thoroughly with cold water. The tub is often ready for use within a few hours, though some products recommend a 24-hour curing period. The result is a tub that looks virtually unchanged but is now dramatically safer to use.
Rubber Bath Mat vs Etched Anti-Slip Coating: Which Stays Effective After 100 Uses?
The humble rubber bath mat is the default safety solution for millions, but it’s a solution fraught with hidden flaws. While it may offer temporary grip, its long-term effectiveness and hygiene are highly questionable. An etched anti-slip coating, on the other hand, provides a more permanent, hygienic, and ultimately cost-effective solution. The key difference lies in integration: one is a temporary layer, the other becomes part of the tub itself.
A bath mat’s primary weakness is its reliance on suction cups. Over time, these cups compress, get clogged with soap scum and biofilm, and lose their ability to adhere firmly to the tub surface. This can lead to the mat itself slipping, creating a sudden and extremely dangerous hazard. Furthermore, the underside of a bath mat is a perfect breeding ground for mould, mildew, and bacteria, creating a slimy layer that is both unhygienic and slippery. This requires weekly removal and scrubbing—a maintenance task that is often overlooked.
In contrast, an etched anti-slip coating integrates safety into the bathtub’s surface. There are no suction cups to fail, no underside to clean, and no place for mould to hide. The slip resistance remains consistent for years, provided it is cleaned with non-abrasive products. A direct comparison reveals the clear superiority of an integrated coating over a temporary mat.
This is further clarified in a comparative analysis of long-term performance, which highlights the hidden costs and risks of bath mats.
| Factor | Rubber Bath Mat | Etched Anti-Slip Coating |
|---|---|---|
| Initial Cost | £15-30 | £30-60 (DIY kit) |
| Lifespan | 6-12 months (requires frequent replacement) | 2+ years with proper maintenance |
| 3-Year Total Cost | £60-120 (4-6 replacements) | £30-90 (1-2 applications) |
| Maintenance | Weekly removal and cleaning required; suction cups collect biofilm | Simple non-abrasive cleaner; no removal needed |
| Hygiene Risk | High: underside breeds mould, bacteria, creates slimy slip layer | Low: integrated surface, easy to sanitize |
| Effectiveness Over Time | Degrades as suction cups compress and fill with debris | Consistent until coating wears from abrasive cleaning |
While a bath mat might seem like a cheaper and easier option initially, the data shows it’s a false economy. The repeated replacement costs, combined with the significant hygiene risks and declining effectiveness, make an etched anti-slip coating the smarter, safer, and more durable choice for long-term bathroom safety.
The Bathroom Cleaner That Strips Your Anti-Slip Coating Within 6 Months
You’ve invested in a high-quality anti-slip treatment for your bathroom floor or tub, creating a safe, high-friction surface. However, the very products you use to keep your bathroom sparkling clean could be systematically destroying that protection. The single biggest threat to the longevity of an anti-slip coating is improper cleaning. Using the wrong type of cleaner can mechanically or chemically strip away the microscopic texture you rely on for grip, returning the surface to a dangerously smooth state in as little as six months.
The primary culprits are abrasive and highly acidic or alkaline cleaners. Abrasive powders (like Comet or Ajax) act like sandpaper at a microscopic level, physically grinding down the textured peaks of the anti-slip surface. Similarly, harsh chemical cleaners can be just as damaging. Strong acidic solutions (like concentrated vinegar or certain toilet bowl cleaners) and high-pH alkaline agents (like bleach or ammonia) can chemically dissolve the polymers or etched profile of the coating. Even seemingly harmless products like waxes or polishes are a problem, as they fill in the textured valleys, creating a smooth, slippery film over the top.
The key to preserving your anti-slip surface is to use a pH-neutral, non-abrasive, and non-film-forming cleaner. These products are designed to lift dirt and soap scum without attacking the surface itself. Maintenance guidelines for high-friction tiles consistently show that regular cleaning with appropriate products maintains slip resistance, whereas polishes or harsh chemicals negate it. Gentle cleaning with a soft cloth or microfiber mop and warm water is often sufficient for daily maintenance. This approach not only protects your investment but, more importantly, ensures the surface remains safe day after day.
Your Action Plan: Safe Cleaning for Anti-Slip Surfaces
- Identify Safe Products: Switch to pH-neutral cleaners specifically marked as non-abrasive and non-film-forming. Check labels for ingredients to avoid.
- Discard Harmful Agents: Remove all abrasive powders, bleach-heavy cleaners, and concentrated acid or solvent-based products from your bathroom cleaning kit to prevent accidental use.
- Adopt a Gentle Method: Use only soft sponges, microfiber cloths, or soft-bristled brushes for cleaning. Never use steel wool or scouring pads on treated surfaces.
- Rinse Thoroughly: After cleaning, always rinse the surface completely with clean water to remove any residual cleaning agent, which could dry and form a film.
- Establish a Routine: Implement a weekly cleaning schedule using only approved products to prevent the buildup of soap scum and body oils, which can reduce grip over time.
How Often Should You Retest and Retreat Your Bathroom Floor to Maintain Slip Protection?
Applying an anti-slip coating is not a « one and done » solution. It’s the beginning of a safety management process. Over time, even with perfect cleaning, foot traffic and daily use will cause microscopic wear and tear, gradually reducing the surface’s friction. The « illusion of safety » can creep back in as a once-grippy floor slowly becomes smoother. To counteract this, a schedule of periodic retesting and, if necessary, re-treatment is essential for maintaining genuine, long-term protection.
The frequency of this schedule depends primarily on the level of traffic the bathroom sees. A high-traffic family bathroom used by multiple people daily will require more frequent checks than a rarely used guest bathroom. While a professional pendulum test is the most accurate method, you can perform a simple ‘touch’ test yourself. When the surface is wet, run your fingers over it. You should feel a distinct drag and resistance. If it begins to feel smooth or slick, it’s a sign that the micro-profile is wearing down and a more formal assessment is needed.
The importance of situation-specific standards and re-testing is a global best practice. For example, a deep dive into the Australian HB 198:2014 slip resistance standard reveals highly detailed criteria for different environments, underscoring that risk is not universal and maintenance must be tailored to use. A proactive maintenance schedule is the best defense against gradual degradation:
- High-traffic main bathroom (2+ users daily): Retest slip resistance every 3 months.
- Medium-traffic shared bathroom (1-2 users daily): Retest every 4-6 months.
- Low-traffic guest bathroom (occasional use): Retest every 6-12 months.
- Immediate Retest Recommended: After any deep cleaning with new or unverified products, or if shiny, worn patches become visible.
For households with particularly vulnerable individuals, commissioning a professional pendulum test annually provides the ultimate peace of mind. If testing indicates a drop in performance, re-treating the surface with a top-up application of your chosen anti-slip product is a simple process that restores the protective micro-profile to its original high-friction state.
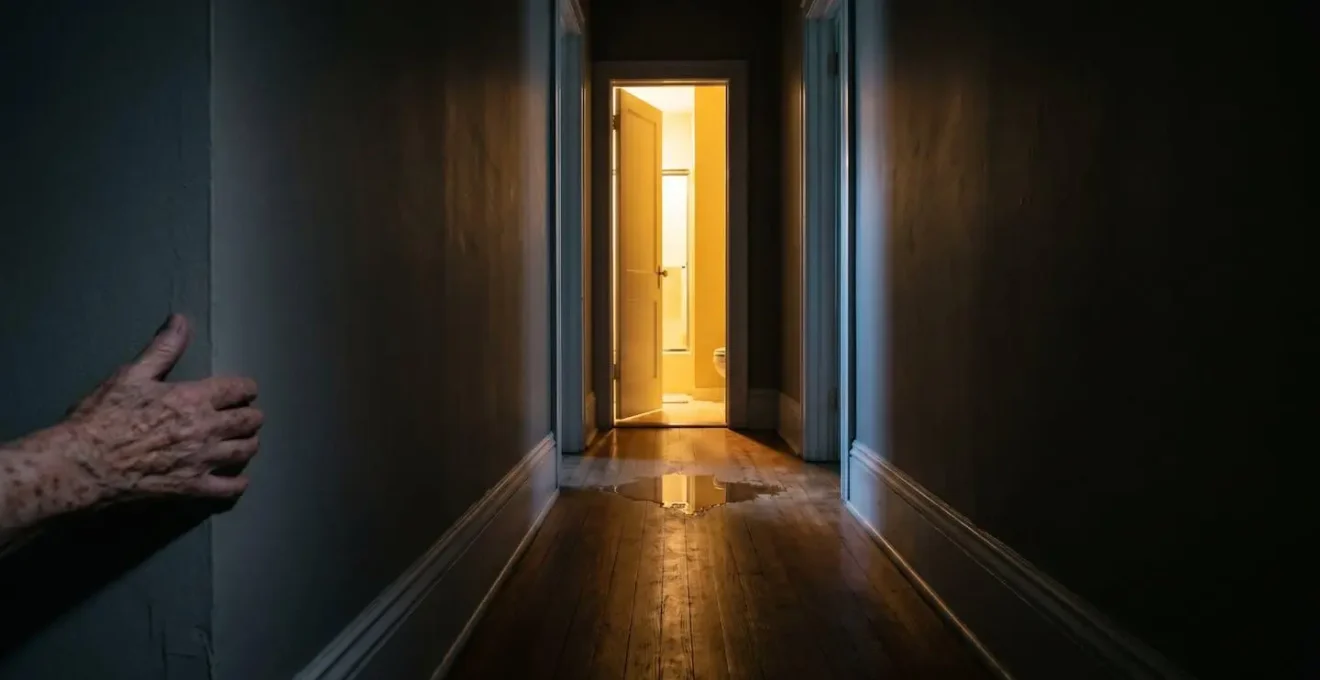
Why Poor Lighting in Your Hallway Could Be the Reason for Your Next Hospital Stay?
A fall in the bathroom doesn’t always begin in the bathroom. It often starts moments before, in a dimly lit hallway. The journey to the toilet at night is one of the most perilous activities for seniors, and the primary culprit is often a dramatic and sudden change in lighting. A dark hallway that leads to a brightly lit bathroom creates a moment of temporary blindness and disorientation that is a major contributor to stumbles and falls.
The physiology is straightforward. As we age, our eyes change. The pupils react more slowly, and the lens can become clouded. This means it takes significantly longer for an older person’s eyes to adjust to changes in light levels. As home health safety guidelines explain, flipping on a bright bathroom light when emerging from a dark corridor can be incredibly disorienting, causing dizziness and a momentary loss of balance. It’s in this split-second of sensory confusion that a foot can catch on a rug or misjudge a step.
The solution is not necessarily more light, but more consistent light. The goal is to create a gentle gradient of illumination rather than an abrupt « on/off » shock to the visual system. This can be achieved through several low-cost strategies. Low-wattage, motion-activated night lights placed along the hallway baseboards can provide a safe, illuminated pathway. Using a dimmer switch for the main bathroom light allows the user to bring the light up gradually. Alternatively, leaving a small, low-intensity night light on inside the bathroom can provide enough ambient light to navigate without the jarring effect of the main overhead fixture.
Shadows are another hidden danger created by poor lighting. A single, harsh overhead light can cast long, deceptive shadows that obscure potential hazards or create optical illusions on the floor, making it difficult to perceive depth and distance accurately. A multi-layered lighting approach, combining ambient overhead light with task lighting, helps to eliminate these dangerous shadows and create a safer, more easily navigated environment.
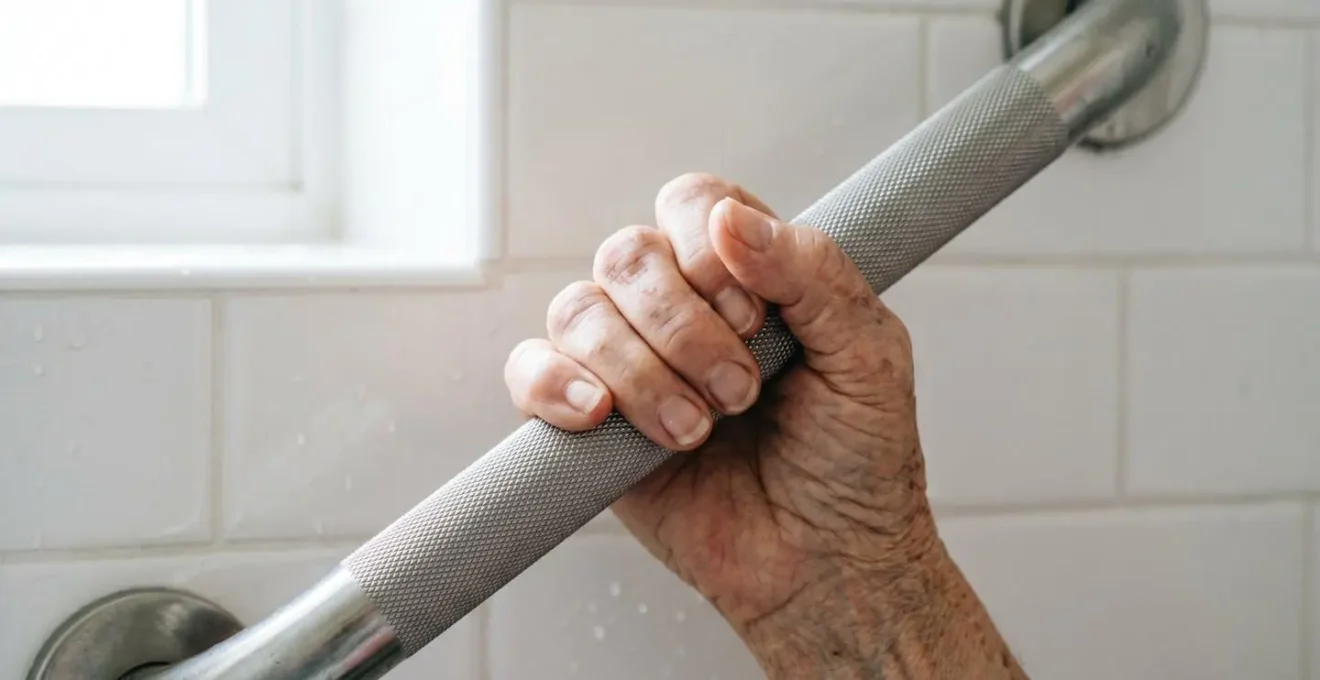
Where Exactly Should Grab Rails Go Around a Toilet to Prevent a Fall Getting Up?
Installing grab rails is a common recommendation, but their effectiveness is entirely dependent on their placement. A poorly positioned rail can be useless or even dangerous. The goal is to place them where they provide biomechanical leverage during the most vulnerable moments: sitting down and, more critically, standing up. The area around the toilet is a prime location for falls, as the sit-to-stand motion involves a complex shift in body weight and balance.
The most common mistake is installing a single, short vertical bar. While better than nothing, it offers limited help for the upward pushing motion needed to stand. For optimal support, a combination of horizontal and angled bars is far more effective. The placement should be customized to the primary user’s body, but official guidelines provide an excellent starting point for a biomechanically sound setup.
Here are the key principles for toilet grab rail placement:
- Side Wall Horizontal Bar: The most important rail. It should be mounted horizontally on the wall closest to the toilet, positioned 33-36 inches above the floor. This allows the user to apply downward pressure with their forearm and hand to push themselves up, mimicking how one would push off the arms of a chair.
- Front Wall/Fold-Down Bars: For toilets with no adjacent side wall, a fold-down bar mounted on the back wall is essential. This provides symmetrical, two-handed support directly in front of the user, allowing for a powerful and stable push-up to a standing position.
- Optimal Positioning: The side wall bar should begin 6-12 inches in front of the toilet bowl’s centerline. This ensures it’s in the perfect position to assist with the lateral weight shift that occurs when standing.
- Load Capacity is Non-Negotiable: Grab rails must be anchored securely into wall studs, not just drywall. They need to support a minimum load of 250-300 pounds. A towel rack is never a substitute for a grab rail.
This strategic placement means that if a user loses balance, they have a solid anchor point to grasp. In fact, research shows that people are 75.8% more likely to regain lost balance if a grab bar is available than without one. It transforms the wall from a passive surface into an active safety device.
Key Takeaways
- True bathroom safety is invisible: it’s the measurable friction (PTV) of a surface, not its visual cleanliness.
- Integrated anti-slip coatings are superior to rubber mats in hygiene, durability, and long-term effectiveness.
- Harsh, abrasive cleaners destroy anti-slip surfaces; use only pH-neutral, non-abrasive products to maintain grip.
Why Does Installing a Grab Rail Reduce Hip Fracture Risk by 30%?
While the exact statistic can vary, the principle is irrefutable: a correctly installed grab rail drastically reduces the risk of serious injury from a fall, including devastating hip fractures. The reason goes beyond simply having « something to grab onto. » A grab rail functions as a crucial piece of biomechanical equipment that intervenes at the three most critical stages of a potential fall: prevention, stabilization, and impact mitigation.
Firstly, they prevent the loss of balance from happening in the first place. During a sit-to-stand motion, a grab rail allows a person to use their arm and upper body strength to assist their legs, ensuring a smooth, controlled, and stable movement. This is especially vital for individuals with muscle weakness, arthritis, or post-operative conditions, as it offloads strain from weaker joints. The static, predictable support provides confidence and reduces the likelihood of a wobble or misstep that could initiate a fall.
Secondly, if a slip or loss of balance does occur, the grab rail provides an immediate point of stabilization. It buys crucial split-seconds for reaction. The human hand can instinctively grip the bar, allowing arm strength to arrest the fall or guide the body into a more controlled descent, rather than a free-fall crash. This is particularly important in the bathroom, where falls have a much higher chance of causing harm. Indeed, compared to falls in the living room, falls in the bathroom were almost two and a half times more likely to result in an injury due to the prevalence of hard, unyielding surfaces.
Case Study: Post-Operative Recovery with Grab Bars
Consider the case of a 65-year-old patient recovering from total hip replacement surgery. The simple acts of sitting and standing from the toilet were fraught with pain and risk. By installing strategically placed grab bars, the patient could distribute their weight, maintain balance using their arms, and significantly reduce the load on their recovering hip. The bars were not just a convenience; they were a critical rehabilitation tool that enabled the patient to maintain their independence and safety, preventing a catastrophic re-injury during a period of extreme vulnerability.
Ultimately, a grab rail is not just a piece of metal on a wall. It is an extension of the user’s own body, a reliable partner in the fight against gravity that provides strength, stability, and security exactly when and where it is needed most.
Now that you understand the principles of surface friction, maintenance, and support, take the first step towards true peace of mind. Assess your bathroom not by how it looks, but by how it performs under wet conditions, and implement these strategies to create a genuinely safe environment.