The persistent wrist, hand, and shoulder pain many seniors experience from crutches isn’t an inevitable side effect; it’s a direct result of improper technique. The common belief that crutches are simple props is dangerously flawed. This guide reframes crutch walking as a skilled movement, teaching you the core engagement and specific gait patterns required to offload your joints, prevent nerve damage, and turn your crutches from a source of pain into a tool for safe, effective recovery.
If you’ve recently had surgery or are managing a chronic condition, you’ve likely been handed a pair of forearm crutches with minimal instruction. The expectation is that they will simply help you get around. Yet, for so many, especially seniors, these essential mobility aids quickly become a source of new pain. A nagging ache in the wrist, numbness in the fingers, or a sharp pain in the shoulder—it’s a story I hear constantly in my practice. You were given a tool to help you heal, so why is it causing more problems?
The standard advice to « adjust the height » and « don’t lean too hard » is dangerously simplistic. It misses the fundamental point: using crutches correctly is not intuitive. It’s a skill that engages a complex network of muscles, particularly in your core, and relies on a precise sequence of movements. Without understanding this, your body compensates, placing immense, repetitive strain on the small joints and nerves of your hands and wrists. This creates a cascade of issues, what we call a break in the kinetic chain, where poor form in your hands leads directly to pain in your shoulders and back.
But what if the problem isn’t the crutch, but how we’ve been taught (or not taught) to use it? The key to pain-free mobility on crutches isn’t a better grip or a softer pad; it’s mastering the technique. It’s about shifting the load from your fragile wrists to your powerful core and learning to move with your crutches as a seamless extension of your body. This is the perspective of a physiotherapist, and it’s the shift in mindset that can transform your recovery.
In this guide, we will move beyond the basics. We’ll break down the biomechanics of safe crutch use, explore why specific pains occur, and provide the technical, supportive advice you need to regain your mobility without compromising your upper body. We will dissect the correct gait patterns, identify the most common and damaging errors, and show you how to progress safely as you heal.
Contents: A Step-by-Step Guide to Safe Crutch Use
- Why Do Forearm Crutches Require More Core Strength Than Most Seniors Realise?
- How to Walk Safely on Crutches Without Putting Illegal Weight Through Your Healing Hip?
- Forearm vs Underarm Crutches: Which Causes Less Nerve Damage in Seniors?
- The Crutch Grip Error That Triggers Numbness and Tingling Within 2 Weeks
- When Should You Reduce Crutch Dependence to Avoid Muscle Wasting and Fear of Falling?
- Why Does a 2-Inch Height Difference in Your Cane Cause Shoulder Pain Within a Month?
- How Soon After Knee Replacement Can You Safely Start Hydrotherapy Pool Exercises?
- Why Does Exercising in Water Build More Strength with Less Pain Than Land Exercise?
Why Do Forearm Crutches Require More Core Strength Than Most Seniors Realise?
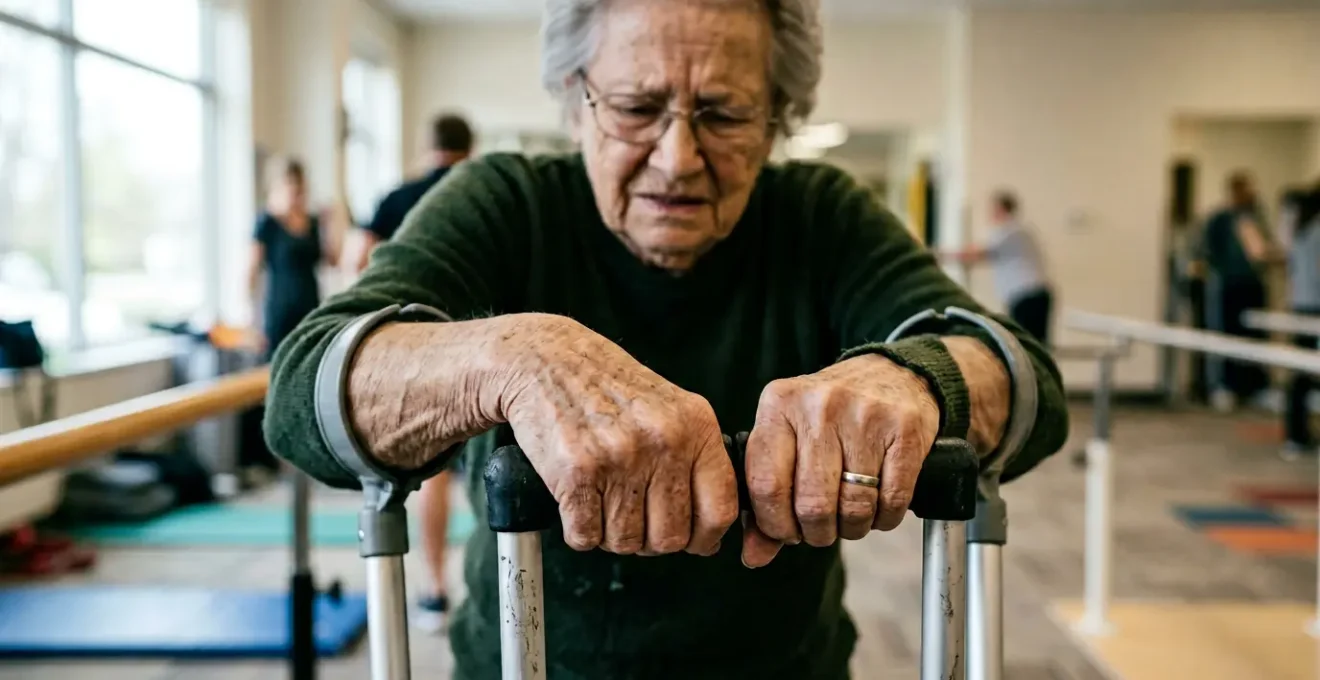
When you first use forearm crutches, the focus is naturally on your arms and hands. They bear the load, they ache, and they feel like they’re doing all the work. This is the first and most critical misunderstanding. Your arms are merely the struts; the engine that powers safe and stable crutch walking is your core. Without active postural control from your centre, your body sags, your shoulders slump, and all that pressure is driven directly down into your wrists.
Think of it this way: each step you take on crutches is a controlled fall. Your core muscles—the abdominals, obliques, and lower back—work continuously to keep you upright and balanced during that split-second transfer of weight. They act as a central stabiliser, creating a rigid trunk that allows your arms to guide and support rather than bear the entire force. When your core is weak or disengaged, your upper body becomes unstable, forcing your hands and wrists to grip harder and absorb more shock to compensate.
This is why many seniors, who may already have some level of deconditioning, find crutch use so exhausting and painful. It’s not a failure of arm strength; it’s a demand for core endurance that they weren’t prepared for. Over time, using crutches with proper technique can actually be a fantastic way to build core strength and improve body awareness. The key is to consciously engage these muscles with every step:
- Abdominals: These muscles are crucial for keeping you upright and preventing you from leaning too far forward.
- Obliques: They provide essential rotational stability as you shift your weight from the crutches to your standing leg.
- Lower back muscles: They support your posture and prevent the excessive forward lean that puts strain on both your back and shoulders.
How to Walk Safely on Crutches Without Putting Illegal Weight Through Your Healing Hip?
After hip or leg surgery, your surgeon will give you a critical instruction: your weight-bearing status. This might be « non-weight-bearing » (NWB) or « touch-down weight-bearing » (TDWB). Violating this instruction, or putting « illegal weight » through the healing limb, can compromise the repair. The key to compliance is not just willpower, but technique. The safest method is the three-point gait pattern.
This pattern transforms you and your crutches into a stable tripod. As described by experts on gait analysis at Physio-pedia, the three-point gait is used when one leg cannot bear full weight. The name comes from the three points of contact on the floor: both crutch tips (acting as one point), the involved leg, and the uninvolved leg. The sequence is the crucial part for safety and stability.
Here is the breakdown of the three-point gait:
- Start from a stable standing position: Your weight should be on your good leg, with the crutches slightly in front of you.
- Advance the crutches and the affected leg: Move both crutches forward together a comfortable distance (about one foot). Simultaneously, swing your affected leg forward so it lands between or slightly behind the crutches. It should only touch the ground if you are « touch-down weight-bearing. »
- Transfer weight and step through: Push down through the crutch handles, engaging your core. Transfer your body weight onto the crutches and swing your good leg forward, landing it in front of the crutches.
This creates a stable base of support at all times. The triangle formed by your good foot and the two crutch tips provides a wide, secure platform from which to initiate the next step, preventing falls and protecting your healing hip. Visualising this tripod can be incredibly helpful for maintaining balance.
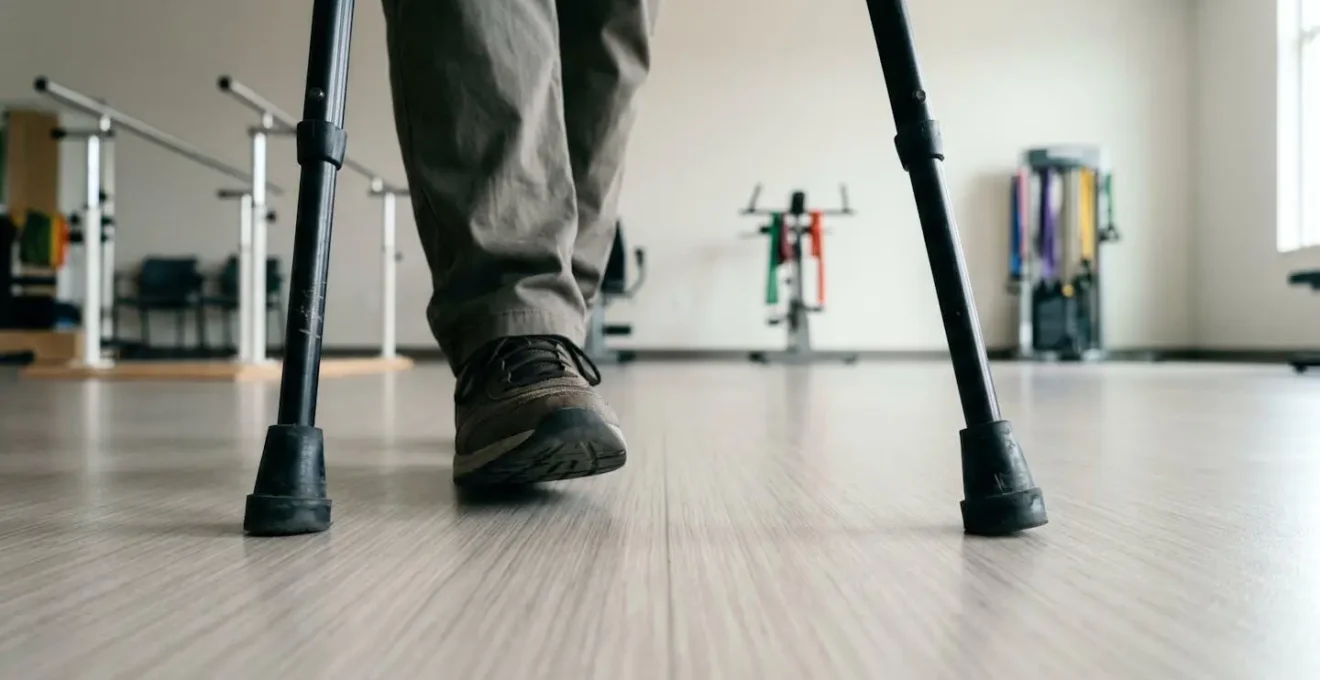
As the image demonstrates, the foundation of safe crutch walking is this tripod of stability. Mastering this rhythm not only protects your surgery but also builds confidence, reduces fear of falling, and creates a more efficient and less tiring walking pattern. It turns a clumsy shuffle into a controlled, safe progression.
Forearm vs Underarm Crutches: Which Causes Less Nerve Damage in Seniors?
In the UK, it’s very common for patients to be issued standard underarm (axillary) crutches for short-term use. This preference is so common that one study observed a 58:1 ratio in their prescription for short-term use compared to forearm crutches. However, for a senior who may need support for more than a few weeks, this common practice can be a gateway to a specific and debilitating type of nerve injury known as « crutch palsy. »
The danger lies in the design. Underarm crutches encourage users, especially when tired, to lean their body weight directly into the armpit. This is a critical mistake. As the medical team at SmartCRUTCH warns, « Prolonged pressure on the armpits can compress the brachial plexus nerves, leading to numbness, tingling, or even muscle weakness in the arms and hands. » The brachial plexus is a complex bundle of nerves that controls your entire arm. Compressing it is like standing on a garden hose; the signals simply can’t get through properly.
Forearm crutches (also called Lofstrand or elbow crutches) avoid this danger entirely. The support is taken through the forearm via a cuff, leaving the armpit completely free. While they require more initial learning and core stability, they are fundamentally safer for the nerves in your upper arm and shoulder for anything beyond very short-term use. They also promote a better, more upright posture. The following table breaks down the risks associated with each type.
| Crutch Type | Nerve at Risk | Location | Symptoms | Risk Level |
|---|---|---|---|---|
| Underarm (Axillary) | Radial nerve / Brachial plexus | Armpit (axilla) | Shoulder weakness, arm numbness, « crutch palsy » | High with improper use |
| Forearm (Lofstrand) | Median nerve / Ulnar nerve | Wrist and hand | Hand numbness/tingling, carpal tunnel-like symptoms | Moderate with prolonged use |
| Underarm | – | – | Best for: Short-term use (under 12 weeks) | – |
| Forearm | – | – | Best for: Long-term or chronic conditions | – |
As the table shows, while forearm crutches are not entirely without risk (which we will address next), they completely eliminate the risk of brachial plexus compression in the armpit. For any senior facing a prolonged recovery, insisting on forearm crutches from the outset is a crucial step in preventing a secondary, and often very distressing, nerve injury.
The Crutch Grip Error That Triggers Numbness and Tingling Within 2 Weeks
So you’ve correctly chosen forearm crutches to avoid armpit nerve damage. Yet, within a couple of weeks, you notice numbness in your thumb and first two fingers, or an ache in your palm that wakes you up at night. This is the other side of the coin: pressure on the nerves of the wrist and hand, specifically the median and ulnar nerves. This is often the first sign of developing carpal tunnel syndrome, a condition directly linked to improper crutch use.
The primary culprit is a flawed grip and wrist position. Many users, in an attempt to feel secure, adopt a « death grip » on the handles and allow their wrist to bend back into hyperextension with every step. This position compresses the carpal tunnel—a narrow passageway in your wrist through which the median nerve passes. As one research team noted, « Repeated loading of the wrist and palmar region and continual hyperextension of the wrist during Lofstrand crutch usage may cause wrist strain, pain, and secondary injuries such as carpal tunnel syndrome. » The link is not theoretical; a clinical study of long-term polio patients found a direct correlation between the hand holding the crutch and the hand developing this condition.
The correct technique is to maintain a neutral wrist. Your hand and forearm should be in a relatively straight line, as if you were giving a firm handshake. The pressure should be distributed evenly across the palm of your hand, not concentrated on the heel of your hand. Your fingers should be relaxed around the grip, not clenched. This position minimises the pressure within the carpal tunnel and protects the nerves. It requires conscious effort at first but quickly becomes a habit that will save you significant pain.
Your 5-Point Grip & Setup Audit
- Hand Position: When your arm hangs loosely, is the top of the crutch handle level with your wrist crease? It should be.
- Elbow Bend: With your hand on the grip, is there a slight, comfortable bend in your elbow (about 15-30 degrees)? You should not have a straight, locked arm.
- Wrist Alignment: Look in a mirror. Is your wrist bent sharply backwards or is it in a straight, neutral line with your forearm? Aim for neutral.
- Pressure Distribution: As you press down, do you feel the pressure across your whole palm, or is it digging into the heel of your hand near your wrist? Spread the load.
- Shoulder Posture: Are your shoulders relaxed and level, or are they hunched up towards your ears? If they are hunched, your crutches are likely too high.
When Should You Reduce Crutch Dependence to Avoid Muscle Wasting and Fear of Falling?
Crutches are a temporary tool. While essential for initial healing, prolonged, unnecessary use can lead to its own set of problems. The muscles in your healing leg begin to weaken from disuse (atrophy), and just as importantly, you can develop a psychological dependence and a fear of falling without them. The transition away from two crutches is a critical milestone in your recovery, and it needs to be managed correctly.
The first sign that you may be ready to reduce dependence is when you are cleared for more weight-bearing by your physiotherapist or surgeon. As you start to place more load through your healing leg, the need for bilateral support decreases. The first step is typically transitioning from two crutches to one. But this comes with a counter-intuitive rule that is vital for correct biomechanics.
You must hold the single crutch in the hand opposite your injured leg. It feels wrong to many people at first, but it is biomechanically correct. As Alberta Health Services physiotherapists advise, « Use the crutch in the hand opposite the injured leg. This gives you better support and helps you walk with more normal movements. » This technique creates a wider base of support and mimics the natural arm swing of a normal gait pattern (as your right leg moves forward, your left arm swings, and vice-versa). Using the crutch on the same side leads to a lurching, unstable gait that puts more strain on your hip and back.

The goal is to gradually increase the amount of time and distance you walk with the single crutch, and eventually, to walk short, safe distances at home without any aid. This progressive weaning process helps to rebuild muscle, restore balance, and, most importantly, re-establish your brain’s confidence in your body’s ability to support itself. Don’t rush, but don’t delay either. Listen to your body and your physio.
Why Does a 2-Inch Height Difference in Your Cane Cause Shoulder Pain Within a Month?
The principles of correct sizing aren’t limited to crutches; they are just as critical for canes. A cane that is just a couple of inches too high or too low can create a cascade of postural problems. The body is an interconnected system—the kinetic chain—and an error at the hand will inevitably travel up to the shoulder, neck, and back.
If your cane is too high, you are forced to hunch or shrug your shoulder with every step to place weight on it. This keeps your rotator cuff and trapezius muscles in a constant state of tension. Over thousands of steps, this repetitive, unnatural movement leads to inflammation, strain, and significant shoulder pain. It also forces your body into an awkward, laterally-flexed posture, which can lead to lower back pain on the opposite side.
If your cane is too low, the problem is reversed but equally damaging. You have to lean over excessively to the side to use it, putting your spine in a compromised position. This lateral lean puts immense strain on the muscles and ligaments of your lower back and can cause shoulder pain from the over-reaching motion. The correct height is the one that allows your posture to remain as neutral and upright as possible.
The fitting guide is simple and universal for both crutches and canes. When you stand up straight in your normal shoes with your arms hanging loosely at your sides, the top of the handle should be level with the crease of your wrist. When you place your hand on the grip, your elbow should have a comfortable, slight bend (around 15-20 degrees). This setup ensures that your shoulder can remain relaxed and your back can stay straight, allowing the aid to support you without creating a new set of postural injuries.
How Soon After Knee Replacement Can You Safely Start Hydrotherapy Pool Exercises?
Hydrotherapy, or aquatic physiotherapy, is a powerful tool for post-operative recovery, especially after a total knee replacement. The buoyancy of the water provides a safe, supportive environment to regain movement and strength with minimal pain. But the timing of when to start is crucial, and depends on one primary factor: wound healing.
The standard clinical guideline is to wait until your surgical incision has fully healed and is completely closed, with no scabs or open areas. Submerging an unhealed wound in water, even a clean hydrotherapy pool, poses a significant risk of infection, which can be a devastating complication for a new joint replacement. For most patients, this means waiting until around 2-3 weeks post-surgery. You must always get clearance from your surgeon or surgical team before starting.
However, emerging research is exploring the benefits of starting even earlier. A fascinating multicenter study published in the Archives of Physical Medicine and Rehabilitation investigated this very question. The lead investigator, Dr. Thoralf R. Liebs, concluded that the timing of physiotherapy, including aquatic therapy, has « clinically relevant effects. » The study found that patients who began a specific aquatic therapy protocol just 6 days after surgery had better outcomes in pain, range of motion, and function compared to those who started at the more traditional 14-day mark. This approach, of course, requires meticulous wound care and specialist supervision.
So what does this mean for you? The safest approach is to follow the standard 2-3 week guideline and wait for your surgeon’s explicit approval. But it’s worth having a conversation with your healthcare team about the possibility of an earlier, supervised start, especially if you are recovering well and have access to a specialised physiotherapy service. Early, pain-free movement is the key to a faster and more complete recovery.
Key Takeaways
- Crutch-related wrist and shoulder pain is not normal; it’s a sign of poor technique, not a lack of strength.
- The foundation of safe crutch use is core engagement and a stable « three-point gait, » not arm strength.
- For any use beyond a few weeks, forearm crutches are significantly safer than underarm crutches as they prevent brachial plexus nerve damage.
Why Does Exercising in Water Build More Strength with Less Pain Than Land Exercise?
The magic of hydrotherapy lies in the unique physical properties of water, which create an ideal environment for rehabilitation. For someone recovering from surgery or suffering from chronic joint pain, it can feel like a miracle. The two primary principles at play are buoyancy and viscosity.
Buoyancy is the upward force that water exerts on the body, counteracting gravity. This is what makes you feel lighter in a pool. This property is a huge advantage for painful or healing joints. When you are submerged in chest-deep water, your body only has to support a fraction of its normal weight. Research into hydrotherapy biomechanics shows that in chest-deep water, you are only bearing 25-35% of your body weight. This massive reduction in joint loading allows you to perform exercises like walking or gentle squats with significantly less pain and stress on a healing knee or hip. You can move through a larger range of motion than you could on land, which helps prevent stiffness and speeds up recovery.
Viscosity, or the natural resistance of water, is the second key component. Unlike on land, where resistance is minimal unless you use weights or bands, water provides a gentle, consistent resistance to every movement. Pushing your leg through water is a form of strength training. The faster you try to move, the greater the resistance becomes. This allows you to build muscle strength in a very controlled and safe way, without the impact or jarring forces of land-based exercise. It’s like having a full-body weight machine that adapts perfectly to your effort level. This combination of support and resistance is what makes aquatic exercise so effective at building strength with less pain.
This unique combination allows for the early and safe re-introduction of movement patterns, helping to reduce swelling, improve circulation, and maintain muscle mass while the body heals. It’s a cornerstone of modern, evidence-based physiotherapy for a very good reason: it works.
By understanding that using crutches is a learned skill, you empower yourself to take control of your recovery. Applying these techniques will not only prevent pain but also build your confidence, improve your stability, and help you return to your life more quickly and safely. Your next step is to consciously apply these principles every time you move.